Announcement

Collapse
No announcement yet.

Plumbing Venting

Collapse

Forum Top GA Ad Widget

Collapse
X
 
  • Filter
  • Time
  • Show
Clear All
new posts

  • Plumbing Venting

    Hi All,

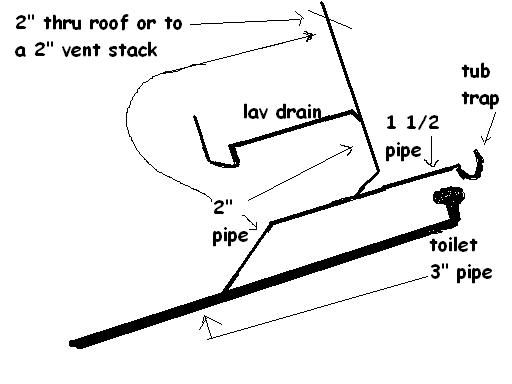
    I am looking for some help with the design of the plumbing venting for additional drains I plan to add. Below are two urls that will show the top and wall view of my current design. However, someone told me I need to vent the two toilets since they are so close together. (one on left is old work and one on right is proposed work) Also, I am concerned with the shower vent and of course all vents in my design.

    I hope my drawings make sense so someone can help. If not, please let me know and I will try my best to paint a clearer image of the plumbing plan.

    In case attached images do not show, please find url's to the images stored at photobucket.com below:
    Top View URL: i811.photobucket.com/albums/zz39/drgto/TopViewa.jpg

    Vall View URL: i811.photobucket.com/albums/zz39/drgto/Detail-Wall-Viewsa.jpg

    Thanks
    Dan

  • #2
    On the kitchen sink option 1 is okay, option 2 would have a flat vent which is subjected to getting clogged.

    Your 2 drawing method is difficult to follow if you could draw it as an "Isometric Drawing" style it would be much easier to follow. See the picture below and note how 3d is depicted in 2d. You don't have to get as crazy labeling everything but some idea if pipe size length and what fixtures are what is good as well as the difference in usage between a tee and a wye & 45 or, combo is shown in the drawing. Venting can be shown with a dotted line and drain lines with a solid line. It's ok if you don't but actually will be easier on both of us...

    An Iso would actually be required by the building department if you were pulling a permit on this job which you should be doing.


    Once we get over to the bathroom its got some problems with venting and possibly fitting usage.

    Venting is needed on all fixtures to protect the trap seal. A vent connection should be made before any downward turn or, tying into a line that has waste flowing in it, and within the correct developed length for the size pipe you are using.

    A sani-tee is used to transition from horizontal to vertical because a wye and 45 el or, a combo which offers direction would choke off the vent, no direction is needed coming in vertical you have gravity for that. On the horizontal runs tying in should be done with a wye and 45 el or, combo because you need the direction guidance that those fittings offer, if you use a sani-tee waste would hit the tee and flow in both directions initially then the side that is pitched upward would drain back possibly depositing a pile of debris which could cause clogging.
    Last edited by Redwood; 01-28-2010, 09:55 AM.
    I stayed at a Holiday Inn Express last night.
    Now I can Plumb!

    For great information on the history of sanitary sewers including the use of Redwood Pipe
    Visit http://www.sewerhistory.org/
    Did you know some Redwood Pipe is still in service today.

    Comment


    • #3
      Isometric Drawing

      Hi Redwood,

      Thanks for taking the time to look at my original drawings. I did as you said (I hope) and drew an isometric drawing (attached) of my flat drawings...it took me all day and I hope it paints a better visual picture of what I am trying to do. This is my first so please forgive how it looks. I did have a problem keeping the size small, so to view all of my notes you may have to view at 300 percent.

      I do have a plumbing permit for the kitchen sink but then realized that the new bath and washer drain I wish to install in the future should be designed as well so the kitchen drain will not have to be adjusted in the future. Just thought it was a good idea to plan ahead and install the necessary 't's and cap for future use.

      Also, please note, that the 'red' lines are existing 4" cast that are enclosed in the walls and the only part exposed is in the basement where the one existing toilet is in place (toilet line in red). So to try to use the existing cast that goes to the roof as a vent would be a bear since many finished walls would have to be removed just to find a place to attach.

      Thanks
      Dan
      Last edited by drgto; 01-28-2010, 03:19 PM.

      Comment


      • #4
        Do you have an attic where you could make vent attachments?
        You really do need some venting
        The laundry line should be 2"
        the lave sink may be able to tie into the shower drain providing a wet vent for the shower.
        How far is it from the lave sink to the shower?

        BTW excellent job on the drawing!
        A super easy to read diagram now...
        Last edited by Redwood; 01-28-2010, 06:41 PM.
        I stayed at a Holiday Inn Express last night.
        Now I can Plumb!

        For great information on the history of sanitary sewers including the use of Redwood Pipe
        Visit http://www.sewerhistory.org/
        Did you know some Redwood Pipe is still in service today.

        Comment


        • #5
          Thanks for your reply and help again. Below are the answers to your questions and some new questions of my own.

          Do you have an attic where you could make vent attachments? No. However, I was looking this evening and I may be able to tap into the vent stack just above the 2nd floor bath which would make it a dry vent vs wet. I took some exterior sheathing down that is now within a ceiling space of the new addition I am building and can see about 3'-0” of 4" cast though it does have 2x4's on each side and may be hard to tap into...but one side is accessible. If I was able, where would I connect the lower end?

          The laundry line should be 2" - I'll note that change.

          How far is it from the lave sink to the shower? If I supply the drain for the lave sink threw the floor it is in the next joist bay (15" away) from the shower and then 3'-0" upstream. The isometric drawing has the drain coming in from behind since that was how I thought would be the best venting for the lave sink.

          Any suggestions on venting the toilets? The original toilet (red line) which is 6'-0" away from the soil stack works great even with a grandfather venting system in place.

          I've also attached a revised (V2) Isometric drawing showing a possible toilet vent.

          Thanks
          Dan
          Last edited by drgto; 01-28-2010, 09:04 PM.

          Comment


          • #6
            Okay,
            The vent sounds like it is coming from the proper location but it doesn't have to be 4", the venting sizing would be covered by a DFU table in the code used in your area. Do you know what code is used where you are?

            Where you tied in the vent for the toilet is not a proper location.
            The vent should be between the toilet and the water running by it in the drain.

            You can have the lav sink drain into the shower via a wye and 45 or a combo rolled up on an angle and it will wet vent the shower.

            Note: in the drawing I put in how some of the drains come in on an angle that would depict a wye. straight then an angle on entering the drain would show a wye and a 45 el or, combo. you may want to include that in your revisions so the building department doesn't reject the plan thinking they are tee's.
            Last edited by Redwood; 01-29-2010, 11:04 AM.
            I stayed at a Holiday Inn Express last night.
            Now I can Plumb!

            For great information on the history of sanitary sewers including the use of Redwood Pipe
            Visit http://www.sewerhistory.org/
            Did you know some Redwood Pipe is still in service today.

            Comment


            • #7
              Hi Redwood,

              I’m in SE PA and am not sure of the code used and the inspectors are no help. When I was doing the electrical they told me I had to add up the breakers to determine the service line amps…that is the point I stopped relying on any of their advice; which was limited anyway.

              I don’t understand where I should tie in the vent for the toilet based on your description. The original toilet is connected via a vertical β€˜T’ and the new proposed toilet was going to be connected via a horizontal β€˜T’ and then a 90 degree elbow. Should I replace the 90 degree elbow with a vertical β€˜T’ and then vent from the back of the β€˜T’ and leave the original toilet as is since it is under a grandfather code?

              Is there some diagram/drawing you can point me to for the lave sink drain into the shower via a wye and 45 or a combo rolled up on an angle that will vent the shower…I guess I don’t understand the difference between a wye and a β€˜Y’ or β€˜T’

              Thanks again,
              Dan

              Comment


              • #8
                The inspectors for electrical said that? Are they crazy? Take a 40 space panel, stick a 20 into each space and add them up 800amps???

                Comment


                • #9
                  I'd leave the existing work alone...
                  Its working unless they make you change it.
                  New stuff I'd do right!

                  This is a crude but great drawing showing a lav wet venting a toilet and tub by a guy that hangs out on another forum.


                  For what fittings look like go to this link:


                  Sani-Tee is drawing #400 on page 23

                  A Combo is drawing #501 on page 30

                  A Wye is drawing #600 on page 33

                  The 45 El would actually be a street 45 or 1/8 street bend and is shown as drawing #323 on page 21

                  The drawing below shows sani-tee vs wye and 45 or, combo on a horizontal transition to vertical with respect to venting. Refer to my earlier post on the usages of sani-tees vs. wye and 45 or, combos on the horizontal and vertical connections.


                  Last edited by Redwood; 01-29-2010, 07:25 PM.
                  I stayed at a Holiday Inn Express last night.
                  Now I can Plumb!

                  For great information on the history of sanitary sewers including the use of Redwood Pipe
                  Visit http://www.sewerhistory.org/
                  Did you know some Redwood Pipe is still in service today.

                  Comment


                  • #10
                    I'm lost. I am having a hard time understanding how to change the bath sink drain to provide a wet vent for the shower based on my existing isometric drawing.

                    I also don't understand how to vent the new toilet.

                    As for not touching existing work, I have to change the ideal bend on the existing toilet to a 'T' to allow for new work or I can not attached the new work to the sewer at all. I can not go over or under the existing toilet cast but can tap into the side of the cast (as 2nd option) from the toilet to the sewer but to me that doesn't seem as clean as just install a 'T' in place of the ideal bend.

                    I've been looking and reading books and searching the web but it just is not clicking as to what I need to change on my current layout. I am just not understanding the changes I need to make.

                    Thanks
                    Last edited by drgto; 01-29-2010, 05:20 PM.

                    Comment


                    • #11
                      It wasn't the electrical inspector that told me about the service line requirements...it was the building inspector that told me that and the same person I would have to go to for plumbing. And the same person that held up my project for 5+ months because they wanted calculations on my engineered seal drawings that cost me big bucks and was just finding anything to delay my project without just cause....and in the end found nothing wrong....it was so frustrating because I may lose my home now because the project is 5+ months behind schedule and my cash flow is gone. It stinks that an inspector can cause such harm and get away with it. That’s why I’m on this forum to find plumbing answers since I don’t have the money to hire a good plumber to do the work. I just need to finish so I can rent my home when finished
                      Last edited by drgto; 01-29-2010, 05:23 PM.

                      Comment


                      • #12
                        Please excuse the bad drawing but a lot was lost in transitioning from pdf to something I could crudely draw on...

                        Something like this attached drawing...
                        Modify it to your house and application...
                        I stayed at a Holiday Inn Express last night.
                        Now I can Plumb!

                        For great information on the history of sanitary sewers including the use of Redwood Pipe
                        Visit http://www.sewerhistory.org/
                        Did you know some Redwood Pipe is still in service today.

                        Comment


                        • #13
                          Revised - Isometric Drawing - V3

                          Hi Redwood,

                          Okay, I hope I have it right. I've revised the isometric drawing to hopefully provide the correct venting. Does this work?

                          If so, I was going to use the following PVC for each toilet from the Charlotte pipe catalog you had posted.
                          1. Toilet directly over 3" drain - Combination WYE & 1/8 bend w/side inlet (part No 515 - pg 32)
                          2. Toilet that branches off a bit - Long sweep 1/4 bend w/side inlet (part No 311 - pg 20)

                          Thanks
                          Dan
                          Last edited by drgto; 01-30-2010, 01:18 PM.

                          Comment


                          • #14
                            Yes you have corrected many of the things.
                            You did loose a bathroom sink that was originally into the vent on the right side that I had used fro wet venting one of the toilets. ??
                            I'd like to see the studor vent go is there any way that could be tied into other vents?

                            Also the correct fittings are not shown on the drawing so I would have to assume the correct fittings would actually be used when physically installed.

                            Do you understand what I have said about the usage of sani-tees vs wye and 45's or, combo's?
                            All vents and drains must maintain a 1/4" per foot pitch and direction in fittings as well.
                            I stayed at a Holiday Inn Express last night.
                            Now I can Plumb!

                            For great information on the history of sanitary sewers including the use of Redwood Pipe
                            Visit http://www.sewerhistory.org/
                            Did you know some Redwood Pipe is still in service today.

                            Comment


                            • #15
                              I missed your wet venting for the toilets by using the sink to the left…is that really necessary with the other dry vent in place? The reason I ask is because that is an existing bath with no access to add venting above.

                              What do you mean by studor vent? Are you referring to the new 1st floor roof vent I added? I could connect that to the existing vent stack if that is preferred.

                              It’s hard to draw fittings on the isometric drawing…that is why I listed two of the toilet fittings in my text. Are they not the correct ones to use? I've listed them below again and added some more.
                              1. Toilet directly over 3" drain
                              ...a. Combination WYE & 1/8 bend w/side inlet (part No 515 - pg 32)
                              ...b. Flush Closet Flange (part No 815 - pg 40)
                              2. Toilet that branches off a bit
                              ...a. Long sweep 1/4 bend w/side inlet (part No 311 - pg 20)
                              ...b. Offset Closet Flange Adjust (part no 820P - pg 41)
                              3. Where 3" turns and 2" continues to kitchen - use 'Y' 3x3x2 something like part no 502 - pg 30 or Sanitary Tee part no 400 -pg 23
                              4. For cleanouts I was thinking of a two way clean out (part no 448 - pg 29)

                              I did not understand what you said about the usage of sani-tees vs wye and 45’s or, combo’s.

                              I do understand that all vents and drains must maintain a ΒΌ” per foot pitch down stream. And I believe I have a handle on the direction of fittings as well. For example, on a ‘y’ the bottom of the ‘y’ should be pointed towards the sewer line but if used for venting the bottom of the ‘y’ should be pointed to the air source. In either case, the goal is to have a smooth flow of waste water or air. Is that correct?

                              Oh by the way, you have been such a great help and I sure hope I pass the 101 course. This has been a great learning experience.
                              Last edited by drgto; 01-30-2010, 02:55 PM.

                              Comment

                              Working...
                              X
                              =